


ArkUI
装饰器
以@开头的是装饰器,可以装饰类,结构体,变量,方法等,并赋予其特殊含义,例如@Entry表示装饰成一个入口组件,@Component,表示装饰成一个组件,@State表示装饰成一个状态变量(具有响应式)。
1.装饰器是一个函数,该函数只在代码加载时执行一次,也就是编译阶段执行的函数。
2.装饰器的语法是@后跟一个函数或者一个执行后返回函数的表达式。
3.这个函数要么不返回值,要么返回一个新对象取代所修饰的目标对象
4.装饰器有两个版本,一个是2014年通过的,一个是2022年通过的,ArkTS里使用的是2014年通过的。
ets文件的基本结构
装饰器
Strcut Index {
@State var1: type = value
build(){
放置各个控件的地方
}
}
供样式复用的装饰器
@styles装饰器:
语法:@styles function commonStyle(){.background(Color.White) ....}
通用样式装饰器,可以写一些通用样式,在需要使用通用样式的地方直接使用commonStyle()即可,但是该装饰器不能传递参数,并且里面只能写公共的样式,也就是所有控件都有的样式属性。
@Extend装饰器:
语法:@Extend(Text) function textStyle(color: string | Color = Color.White, ...){.textAlign(TextAlign.Center)}
扩展装饰器,这个装饰器可以书写某一个控件的样式属性,可以传递参数,可以写该控件的专属属性
多态stateStyles
当控件的状态发生改变时,我们可以给其不同的样式,也就是不同状态,不同样式
语法:
控件.stateStyles({
normal: {.background(Color.white)}
pressed: {.fontColor(Color.Red)}
focused: {.fintSize(20)}//通过.focusable(true),开启控件的可获取焦点
disabled: {.background(Color.Gray)}//通过.enabled(true),激活控件
})
调试
对于ArkTS,不像浏览器那样可以运行的时候查看控制台输出结果来调试代码,一般都是采用的断点调试,在日志地方查看console.log的内容,而且consolo.log只能输出字符串。
this指向
在鸿蒙开发中如果定义函数时用的不是箭头函数,那么在调用时需要通过箭头函数来调用,才能正确获取到当前组件中的数据,也就是这是才会有this,如果是箭头函数,调用是便可以不用箭头函数来单独调用。(鸿蒙中的this是指向组件自身,而原生的this则是谁调用就指向谁)
示例:fun(){console.log(this.n)}//在调用时需要通过箭头函数调用,才能正确获取到this。如果是fun = () => {console.log(this.n)} //在调用时直接调用即可,无需再用箭头函数去执行。
组件化编程
在鸿蒙开发中提倡组件化编程,也就是把页面都变成一个一个的组件,通过组件的导入导出,可以更好地维护。
组件状态共享
场景:被调用的是子组件,公告组件和逻辑组件一般都是子组件。
组件传值
1.父子单项传递:父组件中,在子组件的括号内以对象的形式向子组件传值,子组件通过@Prop来接收,此时子组件收到的值可以在子组件内改变,但是父组件的值是不会改变的。
2.父子双向传递:父组件也是以对象的形式传值(但是键值是$变量名的形式),子组件通过@Link来接收,此时子组件收到的值,在哪里改变,父子组件的值都会改变。
3.后代传值:父组件通过@Provide n:type = default 定义变量,子孙组件通过@Consume(n) :type 来接收,该值所有的子孙组件都能接收(接收的值也是双向的)。(子组件接收的语法:@Consume('默认名') 别名:类型)
4.传递函数:传递的函数的时候需要在父组件定义时,定义为箭头函数(确保this指向不会出问题),在子组件可以通过private,protected,public来接收,接收时一定要初始化。(传递函数一般用于在子组件编辑,更新父组件的内容,往往要修改的不是基本的数据类型,而是数组或者一个对象,此时双向传值就不适用,所以需要通过传递函数来修改)
@State与引用数据类型
@State在声明引用数据类型时,只对第一层的数据具有响应性,对深层的嵌套数据就不具有响应性(这也是为什么上面修改,更新数据时,是通过传递函数来进行修改)。
List组件
提供的用于渲染数组数据的组件,其中每一项数据在ListItem中进行渲染,ListItem中有一个swipAction属性,通过该属性可以实现列表数据的滑动删除功能。
tip: List组件渲染列表时,如果列表里的数据撑满整个List,那么会产生滚动条,并且滚动时具有弹性效果。
Flex组件
语法:Flex(属性){内容},效果就和原生的flex布局一样,同样具有wrap换行属性,主轴交叉轴对齐方式都写在括号里。常用的属性包括direction,justifyContent,alignItems等。
修改引用类型数据的深层数据的值
由于arkts中的@State不深度监听引用类型的数据变化,所以直接对器深度的数据进行修改时不会发生响应性,此时可以通过将数据类型用类来声明,然后利用@Observed监听类的属性变化,此时数据必须要经过父子组件传值,子组件通过@ObjectLink来接收该类类型的数据,此时子组件可以直接对传递过来的引用数据的深层属性进行修改。
Tabs组件
Tabs组件是Arkts提供的一个内置选项卡组件,通过该组件可以很容易实现选项卡功能,并且支持自定义组件的样式。(通常通过bulder进行自定义组件样式)
示例:Tabs(){
Tabcontent(){
text('con1') // 该选项卡对应的内容
}.tabar('title1') //支持传递builder
Tabcontent(){
text('con2') // 该选项卡对应的内容
}.tabar('title2') //支持传递builder
}.onChange((value: number)=>{console.log(value.toString())}) //当选项卡的选中状态发生改变时会执行该函数,接收的value是每一个选项的下标。
Select组件
Select组件是一个内置组件,用于实现下拉选项的功能。语法如下:
//先声明一个select组件能用的数组
@State selectList: SelectOption[] = [{value: 'option1'}, {value: 'option2'} ]
Select(this.selectList).value('请选择').onSelect(index: number, value: any) //选项内容直接通过括号进行传递,value为未选择时的默认值,onSelect()时当选项发生改变是执行的函数,接收两个参数,分别是每一个选项的下标和值。
Scroll组件
Scroll是一个内置组件,可以用于渲染列表数据,当列表数据超过该组件的大小时,便会产生滚动条,但是这个滚动时不具有弹性。
栅格布局
栅格布局一般用于将同一种布局适配多种不同的设备,具体示例如下:
GridRow(){
ForEach('0123456789'.split(''), (item: string)=>{
GridCol({span: {xs: 12, sm: 6, md: 4, lg: 2}}){ //分别表示不同大小的设备,不同的列数,最多12列 (对于xs型设备,最小的设备,12/12也就是1列)
text(item)
}
} )
}
网格布局(Grid)
语法:
Grid(){
ForEach('0123456789'.split(''), (item: string)=>{
GridItem(){
text(item)
}.rowsTemplate('1fr '.repeate(2))
.colsTemplate('1fr '.repeate(4))
//表示生成的网格是2行4列的('1fr '表示每个格子都占1份,而且空格不能少)
})
}
网格布局中的合并单元格
GridItem(){}.columnStart(2).columnEnd(3) //表示第3列第4列进行合并,同理rowStart(0).rowEnd(2) //表示第1行到第三行合并。也可以同时行列合并。
层叠布局
Stack(){控件}//层叠布局,根据书写的结构顺序,从上到下,控件所在层次逐渐增高,可以通过zIndex来改变层叠关系。
响应式失效
在ArkTS中,通过@State声明的引用类型的变量,是不能直接修改该引用数据的深层属性的值的,也就是出现了响应性失效。此时如果要修改深层属性的值,可以考虑整个属性替换或者改用@ObjectLink来接收,若采用这样方式接收,那么必须要在组件传值中进行,并且父组件定义变量时的类型必须是class声明的类型,而且还需要加@Obversed来监听class的属性变化。
也就是说@Obversed和@ObjectLink往往是成对出现,并且@ObjectLink往往用于接收由@Obversed观察的类装饰的变量。
@Watch
@Watch用于监听状态变量的变化,当watch监听的数据变化时便会执行相应的回调函数,@watch在ArkUI框架内部判断变量相等是按照===来严格判断的,只要严格判断的结果为false,就会执行相应的回调。
注意:在watch的回调里应避免直接修改watch监听的变量,以防出现循环的问题。并且不建议在watch回调中使用async/await,因为watch的设计用途就是为了快速计算,如果使用异步可能会导致性能问题。
语法: @Prop @Watch('update') s1: string = ''
update(){console.log(this.s1)}
页面路由
ArkTS里面的路由配置(在resource/base/profile/main_pages.json中)
{
"src": [
"pages/Index" //最后一个的末尾不能有逗号
]
}
路由跳转
router.pushUrl({url: '', params: {}})
router.replaceUrl({url: '', params: {}})
//在跳转后的页面通过router.getParams()来接收传递的值
//router.getLength()//获取页面栈大小
//router.clear() //清空页面大小
在页面返回之前,弹出提示框可以通过
router.showAlertBeforeBackPage({message: '您确定要返回上一页吗?'})
如果用户点击确定则会返回上一页,点击取消则什么都不做
自定义弹出询问框
const result = await PromptAction.showDialog({
message: '您确定要返回吗?',
buttons: [
{
text: '确定',
color: '#f00'
},
{
text: '取消',
color: '#0f0'
}
]
})
if(result === 0){reouter.back()}
if(result === 1){console.log('用户取消操作')}
路由的实例模式
standard模式:每次调用pushUrl,都会新建一个目标也并压入栈顶。
single模式:每次调用pushUrl时,会判断当前页面栈中是否存在要压入栈的目标页,如果存在则直接将栈内的目标页移至栈顶,没有则push进栈。
使用场景:如果需要页面栈只有一份,则用单实例,否则默认,如果页面需要返回就用pushUrl,否则用replaceUrl。
本地存储
ArkTS中的本地存储使用方法如下:
const local = new LocalStorage({name: 'zs'}) //只是初始化,相当于定义了local中有一个键name,初始值为zs。
local.set('name', 'lisi') //将local中的键name的值重新赋值为lisi
console.log(local.get('name')) //实际打印出来的是lisi
由于ArkTS中的local需要通过new 关键字获取实例,所以在实际使用过程中用的少,通常的做法是将localStorage的实例在一个模块中声明并导出,在其他模块直接导入实例,这样就可以保证使用的local实例都是同一个了。
示例代码:
在utils中声明实例并导出
export const local = new LocalStorage({name: 'zs'})
在其他模块中导入local实例,并通过local.set和local.get方法对实例的内容进行读取和修改。
如果一个local实例有多个键值对是,每个键都需要单独使用set赋值。
AppStorage:应用全局的UI状态存储
AppStorage是单例,它的所有API都是静态的
App.SetOrCreate('name', 'zs') //有则修改,没有则创建
console.log(AppStorage.get('name'))
AppStorage.Set('name', 'lisi')
也可以通过@StorageLink('name') name: string = ''; 或者@StorageProp('name') name: string = '';来获取存储的变量
AppStorage VS LocalStorage
LocalStorage: 必须是同一个实例,使用起来比较方便,而且不具有持久化,页面刷新数据便不会存在。
AppStorage:在入口文件进行初始化一次就可以全局使用,使用起来很方便,配合PersistStorage可以实现持久化存储。
数据持久化
AppStorage和PersistStorage配合使用,通过AppStorage存储数据,在入口文件或者配置入口文件的地方写上PersistStorage.PersistProp('token', '后端传过来的token') //这样就将token持久化存储到了AppStorage中,只要不删除应用,无论是刷新还是退出应用重进,该存储的数据都不会消失。
网络请求
在ArkTS中使用网络请求前需要先去module.json5中申明网络权限
{
"module" : {
"requestPermission" : [
"name": "ohos.permission.INTERNET"
]
}
}
发送HTTP请求
const httpRequest = new http.createHttp()
httpRequest.request(url, options?: obj)//默认是get请求,post请求需要在options里面单独配置(包括请求头的配置也在这里,method: http.RequestMethod.POST),返回的结果(Promise对象)包含一个responseCode(200表示请求成功),请求结果放在result里面,是字符串的形式。是异步过程,需要用async/await。
Axios请求
需要通过ohpm i axios安装axios依赖,然后就和TS中使用axios的方法一样。
Builder
ArkUI提供的用于复用布局的一种装饰器,语法为
@Builder navBuilder(params){布局} //支持传递参数,但是传递的params是传递的值而不是引用(地址),所以当builder中传递状态变量(@State修饰的变量)时,当状态变量发生改变时并不会引起builder里面的UI刷新,所以在传递状态变量时,推荐使用引用传递。示例如下:
@Builder navBuilder(params: {text: string}){}
this.navBuilder({text: this.text})
BuilderParam
ArkUI提供的传递UI的装饰器(通常父组件传递一个builder),示例:
@BuilderParam defaultBuilderParam: ()=> void
父组件调用传递builder时,在组件的后面用一个花括号包裹需要传递的UI内容(默认的尾随闭包放在花括号里)。
当要传递多个builder时,就不能在花括号里进行传递,就需要在调用组件的括号里,通过键值对的形式进行传递。示例如下:
默认的尾随闭包:
CustomComponent(){text('test')}
传递多个UI
@Builder firstBuilder(){text('first')}
@Builder secondBuilder(){text('second')}
CustomComponent({first: this.firstBuilder, second: this.secondBuilder}) //不能加括号
CustomComponent组件通过
@BuilderParam first: ()=> void
@BuilderParam second: ()=>void
来接收
V2版的ArkUI
在V2版的ArkUI中,有一些装饰器发生了变化
@Component-->@ComponentV2//表示这是一个V2版本到的组件
@Local//替代了原来的@State,解决了V1中state声明的变量可以直接被外部修改的问题,即local声明的变量只能在组件内部进行修改,其它组件要修改该变量必须通过该组件提供方法让其修改。
@Param//针对与V2中local声明的变量,子组件统一用@Param来接收,接收时需要初始化(如果不想初始化可以通过@Require来修饰,表明调用该子组件时必须传递该参数),同时也可以通过@Once修饰,用once修饰之后表明这个变量只接收一次,即后续父组件的值发生变化时,该变量的值也不会变化。
@Monitor(var1, var2, ...) //要监听的变量
change(monitor: IMonitor){console.log(JSON.stringify(monitor))}
V2中的监听器,相比V1的watch而言,monitor可以监听多个变量,并且可以监听到新值和旧值
@Computed
get fullName(){return this.firstName+','+this.lastName}
V2中的计算属性,只能装饰getter方法,在调用时直接this.fullName即可。
@Event 函数
V2中接收函数不再使用private那些修饰符,而是使用@Event来装饰函数,接收时根据情况初始化函数。
@ObservedV2和@Trace
在V2中,使引用类型数据具有深度响应性修改为@ObservedV2和@Trace来修饰(一样的修饰类类型的变量),使用示例:
@ObservedV2/@Trace
export class Student{id: number = 0, name: string = '', @Trace age: number = 20}
//通过@Trace修饰的属性就具有深层响应性,在修改该类型的数据时,可以直接修改age属性的值,不需要像V1那样通过组件传值再修改。
@Provider/@Consumer
V2中的后代传值将两个装饰器修改为了provider和consumer
实现上拉刷新和下拉加载功能
在实现上拉刷新功能时可以通过内置组件Refresh来实现,示例如下:
Refresh({refreshing: $$this.isRefresh}){List(){}}.onRefreshing(()=>{})
//双向绑定一个boolean变量,该变量可以控制刷新的关闭,当为false时,刷新关闭(结束)
//当刷新时执行对应的回调函数
下拉加载功能可以通过List组件来实现,示例如下:
List(){数据列表}.onReachEnd(()=>{this.getDataList()})
鸿蒙的模块化管理
OHPM由openharmony三方中心库网站,命令行工具,openharmony三方库中心仓库组成,提供了一系列已经写好的第三方工具(模块)。我们也可以将自己写好的模块上传到该仓库供其他开发者使用。
初次上传工具流程如下:
1.创建第三方库
新建一个模块,选择static类型的模块。创建好之后在oh-package.json5中配置好如下信息:
{
"name": "@open/date", // 声明你开发的三方库后期下载的模块 ohpm install 这个命令 来下载的
"version": "1.0.0",
"description": "轻量级Date时间戳格式化模块,通过YmdHis随意组合转换,使其可以运行在 OpenHarmony,并沿用其现有用法和特性。",
"main": "Index.ets", // 导出数据来源(后期导入的数据就是从这里面来的)
"author": "wof",
"license": "MIT",
"keywords": ["date", "format", "moment", "timeAgo", "dayjs", "time", "open"],
…..
…..
}
2.在模块的跟目创建三个文件
README.md 文件,描述您三方库的代码以及如何使用它,文件不能为空。
CHANGELOG.md 文件,描述您三方库的代码不同版本的变更内容,文件不能为空。
LICENSE 文件,指定该软件包可以在什么样的许可下被使用、修改和共享,文件不能为空。
LICENSE内容如下:
                    Apache License
                           Version 2.0, January 2004
                        http://www.apache.org/licenses/

   TERMS AND CONDITIONS FOR USE, REPRODUCTION, AND DISTRIBUTION

   1. Definitions.

      "License" shall mean the terms and conditions for use, reproduction,
      and distribution as defined by Sections 1 through 9 of this document.

      "Licensor" shall mean the copyright owner or entity authorized by
      the copyright owner that is granting the License.

      "Legal Entity" shall mean the union of the acting entity and all
      other entities that control, are controlled by, or are under common
      control with that entity. For the purposes of this definition,
      "control" means (i) the power, direct or indirect, to cause the
      direction or management of such entity, whether by contract or
      otherwise, or (ii) ownership of fifty percent (50%) or more of the
      outstanding shares, or (iii) beneficial ownership of such entity.

      "You" (or "Your") shall mean an individual or Legal Entity
      exercising permissions granted by this License.

      "Source" form shall mean the preferred form for making modifications,
      including but not limited to software source code, documentation
      source, and configuration files.

      "Object" form shall mean any form resulting from mechanical
      transformation or translation of a Source form, including but
      not limited to compiled object code, generated documentation,
      and conversions to other media types.

      "Work" shall mean the work of authorship, whether in Source or
      Object form, made available under the License, as indicated by a
      copyright notice that is included in or attached to the work
      (an example is provided in the Appendix below).

      "Derivative Works" shall mean any work, whether in Source or Object
      form, that is based on (or derived from) the Work and for which the
      editorial revisions, annotations, elaborations, or other modifications
      represent, as a whole, an original work of authorship. For the purposes
      of this License, Derivative Works shall not include works that remain
      separable from, or merely link (or bind by name) to the interfaces of,
      the Work and Derivative Works thereof.

      "Contribution" shall mean any work of authorship, including
      the original version of the Work and any modifications or additions
      to that Work or Derivative Works thereof, that is intentionally
      submitted to Licensor for inclusion in the Work by the copyright owner
      or by an individual or Legal Entity authorized to submit on behalf of
      the copyright owner. For the purposes of this definition, "submitted"
      means any form of electronic, verbal, or written communication sent
      to the Licensor or its representatives, including but not limited to
      communication on electronic mailing lists, source code control systems,
      and issue tracking systems that are managed by, or on behalf of, the
      Licensor for the purpose of discussing and improving the Work, but
      excluding communication that is conspicuously marked or otherwise
      designated in writing by the copyright owner as "Not a Contribution."

      "Contributor" shall mean Licensor and any individual or Legal Entity
      on behalf of whom a Contribution has been received by Licensor and
      subsequently incorporated within the Work.

   2. Grant of Copyright License. Subject to the terms and conditions of
      this License, each Contributor hereby grants to You a perpetual,
      worldwide, non-exclusive, no-charge, royalty-free, irrevocable
      copyright license to reproduce, prepare Derivative Works of,
      publicly display, publicly perform, sublicense, and distribute the
      Work and such Derivative Works in Source or Object form.

   3. Grant of Patent License. Subject to the terms and conditions of
      this License, each Contributor hereby grants to You a perpetual,
      worldwide, non-exclusive, no-charge, royalty-free, irrevocable
      (except as stated in this section) patent license to make, have made,
      use, offer to sell, sell, import, and otherwise transfer the Work,
      where such license applies only to those patent claims licensable
      by such Contributor that are necessarily infringed by their
      Contribution(s) alone or by combination of their Contribution(s)
      with the Work to which such Contribution(s) was submitted. If You
      institute patent litigation against any entity (including a
      cross-claim or counterclaim in a lawsuit) alleging that the Work
      or a Contribution incorporated within the Work constitutes direct
      or contributory patent infringement, then any patent licenses
      granted to You under this License for that Work shall terminate
      as of the date such litigation is filed.

   4. Redistribution. You may reproduce and distribute copies of the
      Work or Derivative Works thereof in any medium, with or without
      modifications, and in Source or Object form, provided that You
      meet the following conditions:

      (a) You must give any other recipients of the Work or
          Derivative Works a copy of this License; and

      (b) You must cause any modified files to carry prominent notices
          stating that You changed the files; and

      (c) You must retain, in the Source form of any Derivative Works
          that You distribute, all copyright, patent, trademark, and
          attribution notices from the Source form of the Work,
          excluding those notices that do not pertain to any part of
          the Derivative Works; and

      (d) If the Work includes a "NOTICE" text file as part of its
          distribution, then any Derivative Works that You distribute must
          include a readable copy of the attribution notices contained
          within such NOTICE file, excluding those notices that do not
          pertain to any part of the Derivative Works, in at least one
          of the following places: within a NOTICE text file distributed
          as part of the Derivative Works; within the Source form or
          documentation, if provided along with the Derivative Works; or,
          within a display generated by the Derivative Works, if and
          wherever such third-party notices normally appear. The contents
          of the NOTICE file are for informational purposes only and
          do not modify the License. You may add Your own attribution
          notices within Derivative Works that You distribute, alongside
          or as an addendum to the NOTICE text from the Work, provided
          that such additional attribution notices cannot be construed
          as modifying the License.

      You may add Your own copyright statement to Your modifications and
      may provide additional or different license terms and conditions
      for use, reproduction, or distribution of Your modifications, or
      for any such Derivative Works as a whole, provided Your use,
      reproduction, and distribution of the Work otherwise complies with
      the conditions stated in this License.

   5. Submission of Contributions. Unless You explicitly state otherwise,
      any Contribution intentionally submitted for inclusion in the Work
      by You to the Licensor shall be under the terms and conditions of
      this License, without any additional terms or conditions.
      Notwithstanding the above, nothing herein shall supersede or modify
      the terms of any separate license agreement you may have executed
      with Licensor regarding such Contributions.

   6. Trademarks. This License does not grant permission to use the trade
      names, trademarks, service marks, or product names of the Licensor,
      except as required for reasonable and customary use in describing the
      origin of the Work and reproducing the content of the NOTICE file.

   7. Disclaimer of Warranty. Unless required by applicable law or
      agreed to in writing, Licensor provides the Work (and each
      Contributor provides its Contributions) on an "AS IS" BASIS,
      WITHOUT WARRANTIES OR CONDITIONS OF ANY KIND, either express or
      implied, including, without limitation, any warranties or conditions
      of TITLE, NON-INFRINGEMENT, MERCHANTABILITY, or FITNESS FOR A
      PARTICULAR PURPOSE. You are solely responsible for determining the
      appropriateness of using or redistributing the Work and assume any
      risks associated with Your exercise of permissions under this License.

   8. Limitation of Liability. In no event and under no legal theory,
      whether in tort (including negligence), contract, or otherwise,
      unless required by applicable law (such as deliberate and grossly
      negligent acts) or agreed to in writing, shall any Contributor be
      liable to You for damages, including any direct, indirect, special,
      incidental, or consequential damages of any character arising as a
      result of this License or out of the use or inability to use the
      Work (including but not limited to damages for loss of goodwill,
      work stoppage, computer failure or malfunction, or any and all
      other commercial damages or losses), even if such Contributor
      has been advised of the possibility of such damages.

   9. Accepting Warranty or Additional Liability. While redistributing
      the Work or Derivative Works thereof, You may choose to offer,
      and charge a fee for, acceptance of support, warranty, indemnity,
      or other liability obligations and/or rights consistent with this
      License. However, in accepting such obligations, You may act only
      on Your own behalf and on Your sole responsibility, not on behalf
      of any other Contributor, and only if You agree to indemnify,
      defend, and hold each Contributor harmless for any liability
      incurred by, or claims asserted against, such Contributor by reason
      of your accepting any such warranty or additional liability.

   END OF TERMS AND CONDITIONS

CHANGELOG.md内容如下:
## 1.0.0

- 第一个版本

REAMDE.md里面就写如何使用该工具模块
3.将模块构建成har包
通过菜单栏的builde,构建模块
4.本地测试
在需要使用的模块中的oh-package.json5文件中引入刚刚构建的har包进行测试。
"dependencies": {
"folder": "file:../folder" 引用本地文件夹
}
"dependencies": {
"package": "file:./package.har" 引用本地压缩包
}
"dependencies": {
"@open/study_library": "file:../studyLibrary" 参考案例
}
import { Kuangkuang, random } from '@open/study_library'
发布第三方仓库
在发布第三方仓库之前,需要先去创建一个OpenHarmony三方库帐号(同时申请一个组织,在上传自己的模块时用自己的组织名即可)。
1.创建公钥和私钥
在D盘(不是C盘就行,自己能知道在那儿就ok)创建一个.ssh_ohpm目录,并在该目录下打开cmd,输入下面的命令。如果成功的话该目录下会生成两个mykey文件,其中后缀为.pub的为公钥文件,另一个就是私钥文件。
ssh-keygen -m PEM -t RSA -b 4096 -f d:/.ssh_ohpm/mykey
2.个人认证
创建成功后将公钥(mykey.pub的内容)上传到OpenHarmony三方库的个人中心的个人认证(新增,把公钥贴进去保存即可)。
3.配置私钥路径
cmd执行:ohpm config set key_path ~/.ssh_ohpm/mykey //(确保ohpm是全局的)
配置ohpm的私钥文件路径(.ohpmrc)
4.配置发布码
去到个人中心点击赋值发布码,然后执行下面代码
ohpm config set publish_id your_publish_id
5.配置本地发布地址
ohpm config set publish_registry https://ohpm.openharmony.cn/ohpm
6.发布har包
ohpm publish 你的har包路径
发布成功后会在个人中心等待审核
在后续的发布新模块时,只需要执行最后一个指令即可。(新建的模块记得指定好作者和描述)
手势识别(Gesture)
TapGesTure: 触碰手势
语法:
.gesture(.TapGesture({count: 2}).onAction((e: GestureEvent)=>{})) //count表示双击触碰
LongPressGesture: 长按手势
SwipeGesture: 滑动手势 //通过SwipeDirection确定滑动方向
PanGesture: 滑动手势 //通过PanDirection指定滑动方向触发,通过事件对象e可以获取滑动的位置,从而确定滑动方向。
ArkData(方舟数据管理)应用数据持久化
应用数据持久化,就是指将内存中的数据写到文件或者磁盘中
ArkData的数据持久化分为
用户首选项(preference):通常用于保存应用的配置信息。数据通过文本的形式保存在设备中,应用使用过程中会将文本中的数据加载到内存中,所以访问速度块,效率高,但是不适合存储大量数据。
键值型数据库(KV-Store):一种非关系型数据库,其数据以键值对的形式进行组织索引和存储,其中键作为唯一标识符。适合很少的数据关系和业务关系的业务数据存储(备忘录)。同时因其在分布式场景中降低了解决数据库版本兼容问题的复杂度和数据同步过程中冲突解决的复杂度而被广泛使用。相比较于关系型数据库,更容易做到跨设备版本兼容。(基本不用)
关系型数据库(RelationStore):一种关系型数据库,以行和列的形式存储数据,广泛应用于应用中的关系型数据的处理,包括一些列的增删改查等接口,开发者也可以运行自定义的SQL语句来满足复杂业务场景的需要。
用户首选项(preference)
1.导入模块
import { preferences } from '@kit.ArkData';
2.获取实例
const dataPreferences: preferences.Preferences | null = null;
const options: preferences.Options = { name: 'myStore' };
dataPreferences = preferences.getPreferencesSync(this.context, options); //需要传入一个上下文对象
3.使用
1.存
putSync(键,值); 存在就覆盖 hasSync(键) 判断是否存在 内存
flush() 把内存刷到磁盘 实现数据持久化
2.读
getSync(键,默认值)
3.删
deleteSync(键)
基础使用
先在entryability中导入preferences模块
import { preferences } from '@kit.ArkData';
然后在onWindowStorageCreate将preferences初始化
// 留心2:通过 dataPreferences 实例化对象可以动态获取数据
const dataPreferences = preferences.getPreferencesSync(this.context, {
name: 'myStore' // 存储的文件名 存的是内存可以刷新到磁盘文件中
});
AppStorage.setOrCreate('dataPreferences', dataPreferences) // 留心1:这里不具备实战仅仅是学习语法,因为实战是不会用AppStorage存储用户首选项preferences实例化对象的。
用户首选项封装
export class preTool{
private instance: preferences.Preferenc | null = null;
consturctor(ctx: common.UIAbilityContext){
this.instance.loadIns(ctx)
}
public loadIns(ctx: common.UIAbilityContext){
const options: preferences.Options = {name: 'myStore'};
this.instance.getPreferencesSync(ctx, options)
}
public save(key: string, value: preferences.Value){
this.instance.putSync(key, value);
}
public persistSave(key: string, value: preferences.Vaule){
this.instance.putSync(key, value);
this.instance.flush();
}
public get(key: string, defaultValue: preferences.Value){
return this.instance.getSync(key, defaultValue);
}
public remove(key:string){
this.instance.delete(key)
}
}
//在需要使用的地方导入该模块即可
import {preTool} from 'path';
private pretool: preTool = new preTool(getContext(this) as common.UIAbilityContext)
关系型数据库(relationalStore)
1.创建一个关系型数据库实例(创建一个数据库)
import {relationalStore} from '@kit.ArkData'
//配置数据库信息
const db_config: relationalStore.StoreConfig = {
name: 'db_name',
securityLevel: relationalStore.SecurityLevel.S3 //安全级别越高,数据保护越高
}
//创建数据库
const db_store: relationalStore.getRdbStore(getContext(this), db_config, (err, rdb)=>{})
执行sql语句
const sqlCreateTable: string = `create table if not exists student(
id integer primary key autoincrement,
name text not null,
age integer
)`
db_store.executeSql(sqlCreateTable)
关系型数据库的封装
export class databaseTool{
//获取一个关系型数据库实例对象
private database: relationalStore.RdbStore | null = null
static predicates: relationalStore.RdbPredicates
private table_name: string = ''
constructor( db_config?: relationalStore.StoreConfig) {
const config: relationalStore.StoreConfig = db_config || {
name: 'myDataBase',
securityLevel: relationalStore.SecurityLevel.S1
}
this.loadDbIns(config)
}
/***
* param:
* db_config
*/
private async loadDbIns(config: relationalStore.StoreConfig): Promise<void> {
return await new Promise((resolve, reject) => {
relationalStore.getRdbStore(getContext(this) as Context, config, (err, store) => {
if (err) {
console.error(`数据库初始化失败: Code:${err.code}, message:${err.message}`);
reject(err);
return;
}
console.info('数据库初始化成功');
store.version = 3;
this.database = store;
resolve();
});
});
}
public async createTable(table_name: string, keys: string[]): Promise<void>{
return await new Promise((resolve, reject)=>{
const insertTableSql: string = `
create table if not exists ${table_name} (
${keys.map((item:string)=>item).join(',')}
)
`
this.database?.executeSql(insertTableSql, (err)=>{
if(err){
console.log(`${table_name}表插入出错:`+JSON.stringify(err))
reject(-1)
}else {
this.table_name = table_name
resolve()
}
})
})
}
public async insert(table_name: string, value: relationalStore.ValuesBucket): Promise<number>{
return await new Promise((resolve, reject)=>{
this.database?.insert(table_name, value, (err, rowId: number)=>{
if(err){
console.log('插入记录失败!!!'+err)
reject(0)
}else {
resolve(rowId)
}
})
})
}
public async query(table_name: string = this.table_name, key:string, value: relationalStore.ValueType): Promise<object>{
databaseTool.predicates = new relationalStore.RdbPredicates(table_name)
databaseTool.predicates.equalTo(key, value)
return await new Promise((resolve, reject)=>{
this.database?.query(databaseTool.predicates, (err:BusinessError, result)=>{
if(err){
console.log('数据查询失败!!!'+err)
reject([])
}else {
const res: object[] = []
while (result.goToNextRow()){
res.push(result.getRow())
}
resolve(res)
result.close()
}
})
})
}
public async update(table_name: string = this.table_name, key:string, value: relationalStore.ValueType, newValue: relationalStore.ValuesBucket): Promise<number>{
databaseTool.predicates = new relationalStore.RdbPredicates(table_name)
databaseTool.predicates.equalTo(key, value)
return await new Promise((resolve, reject)=>{
this.database?.update(newValue, databaseTool.predicates, (err, rowId: number)=>{
if(err){
console.log('修改记录失败!!!'+err)
reject(0)
}else {
resolve(rowId)
}
})
})
}
public async delete(table_name: string = this.table_name, key:string, value: relationalStore.ValueType): Promise<number>{
databaseTool.predicates = new relationalStore.RdbPredicates(table_name)
databaseTool.predicates.equalTo(key, value)
return await new Promise((resolve, reject)=>{
this.database?.delete(databaseTool.predicates, (err, rowId: number)=>{
if(err){
console.log('删除记录失败!!!')
reject(0)
}else {
resolve(rowId)
}
})
})
}
}
使用
import {databaseTool} from 'modulepath'
@Provide dbTool: databaseTool = new databaseTool()
ArkWeb(方舟Web)webview
ArkWeb提供了web组件,该组件可以在应用程序内显示web内容,为开发者提供页面加载,页面交互,页面调试等功能。
页面加载:Web组件可以加载基本的前端页面,包括网络页面,本地页面以及基本的html文本数据。
页面交互:web组件提供了丰富的页面交互方式,包括:设置前端页面深色模式,新窗口中加载页面,位置权限,Cookie管理,引用侧使用前端JS的能力。
页面调试:web组件支持使用Devtools工具调试web页面。
ps:必须在虚拟机或真机环境下运行,并且要开启网络权限。
web组件基本用法:
private webController: webview.WebViewController = new webview.WebViewController()
Web({src: 'http://m.baidu.com', controller: this.webController}) //引用网络页面
Web({src: $rawfile('test.html', controller: this.webController)}) //引用本地页面
//通过controller加载不同的页面
Button('baidu').onClick(()=>{this.webController.loadUrl('http://m.baidu.com')})
调试工具vConsole
https://gitee.com/Tencent/vConsole
该调试工具是由腾讯开发的一个轻量,可拓展,适用于手机web页面的调试工具。该工具与框架无关,适用于react,vue或其它任何框架。该工具也是微信小程序的官方调试工具。
使用:
<script src="https://unpkg.com/vconsole@latest/dist/vconsole.min.js"></script>
<script>
const vConsole = new window.vConsole()
setTimeout(() => {
// 设置开关按钮的位置。
vConsole.setSwitchPosition(0, 700);
}, 300);
document.querySelector("button").onclick = function () {
console.log("hello");
};
</script>
鸿蒙原生与H5的交互
应用侧通过runJavaScript()来调用JS中自定义的方法,示例:
<script>
function changeColor(color){document.body.style.backgroundColor(color)}
</script>
在应用侧:
Button('changeColor').onClick(()=>{
this.webController.runJavaScript('changeColor("#0f0")') //没有参数就不写
})
H5调用原生鸿蒙里的方法
方法1:
Web({src: $rawfile('test.html')}).javaScriptProxy({
object: this,
name: 'hmObj', // H5中使用的代理对象名
methodList: ['showToast'], //要调用的Arkts中的方法名
controller: this.webController
})
//在前端页面
<script>
hmObj.showToast("hello world!!!")
</script>
Ability kit (程序框架服务) stage模型
应用模型是系统为开发者提供的应用程序所需能力的抽象提炼,它提供了必备的组件和运行机制。有了应用模型,开发者可以基于一套统一的应用模型进行开发,使开发更简单,高效。
应用模型的构成包括:
1.应用组件:应用的基本组成单位,是应用程序的入口。
2.应用进程模型:定义了应用的创建和销毁方式,以及进程间的通信方式。
3.应用线程模型:定义了应用内进程的创建和销毁的方式,主线程和UI线程的创建和销毁方式,以及线程之间的通信方式。
4.应用任务管理模型:定义了任务的创建和销毁方式,以及任务和组件之间的关系。所谓任务,即用户使用一个应用组件实例的记录。每次用户启动一个新的应用组件实例,都会生成一个新的任务。例如,用户启动一个视频应用,此时在“最近任务”界面,将会看到视频应用这个任务,当用户点击这个任务时,系统会把该任务切换到前台,如果这个视频应用中的视频编辑功能也是通过应用组件编写的,那么在用户启动视频编辑功能时,会创建视频编辑的应用组件实例,在“最近任务”界面中,将会展示视频应用、视频编辑两个任务。
多窗口开发
基础使用:先在需要开发多个窗口的模块里新建一个page(要配置好路由),在选中对应的模块右键新建一个Ability,并将新建的Ability的入口页面修改为刚才新建的page,然后在该模块需要打开新窗口的页面下添加函数,通过want对象去拉起一个新的窗口。示例如下:
新建page:newPage.ets
入口页面Index.ets:
private context: common.UIAbilityContext = getContext(this) as common.UIAbilityContext;
Button('go new page').onClick(()=>{
const want: Want = {
deviceId: '',
bundleName: 'com.example.test',
abilityName: 'Ability2', //一定要和module.json5下面的Ability2的name一致
parameters: {} //传递参数
}
this.context.startAbility(want) //拉起一个新窗口
})
在module.json5中,可以通过Ability2的launchType: "singleton" | "multiton" | "specified" //设置窗口的启动模式。
singleton: 同一个窗口只保留最新的那个窗口
multiton: 每拉起一个窗口就会开启一个新的窗口
specified: 原来存在该窗口则使用原来的窗口,否则就创建一个新的窗口。
tip: specified拉起窗口时,需要单独配置
在新建的Ability的ets文件下,配置写下面的函数:
export default class Ability2 extends UIAbility {
...其它代码
onAcceptWant(want: Want): string{
  if(want.abilityName === 'Ability2'){
    if(want.parameters?.instanceKey){
      return `SpecifiedAbilityInstances_${want.parameters.instanceKey}`
    }
  }
  return ''
}
}
在拉起新窗口的页面的want对象添加参数instanceKey,该参数作为该UIAbility的唯一标识
specified模式会根据该方法返回的字符串决定拉起的新窗口。
UIAbility的生命周期
onCreate: 窗口创建的时候触发
onBeforeground: 窗口在前台的时候触发
onBackgound: 窗口在后台的时候触发
onDestroy: 窗口销毁的时候触发
鸿蒙里面的进程和线程
进程:鸿蒙里的进程大致分为主进程,UI进程(渲染进程),扩展进程。
线程:鸿蒙里的线程分为主线程,TaskPool worker,woker
taskpool主要执行耗时任务,支持调度优先级,负载均衡,推荐使用。
worker也是用于执行耗时任务,支持线程之间的通信。
主线程主要的功能有:
1.执行UI绘制
2.管理主线程的ArkTS引擎实例,使多个UIAbility实例能运行在主进程之上。
3.管理其它线程的ArkTS引擎实例,例如使用taskPool(任务池)创建或取消任务,启动或终止work线程。
4.分发交互事件。
5.处理应用代码的回调,包括事件的处理和生命周期。
6.接收taskPool和work线程发送的消息。
FA模型与Stage模型的区别
主要区别:在Stage模型中,多个应用组件共享同一个ArkTS引擎实例,而FA模型中,每一个应用组件独享一个ArkTS引擎实例,所以Stage模型中,应用组件能更好的共享组件之间的对象和状态,同时也能减少复杂应用对内存的占用。Stage模型作为主推的应用模型,开发者能够通过它更方便的开发出分布式场景下的复杂应用。
其它区别:
1.FA有PageAbility,ServiceAbility,DataAbility;而Stage有UIAbility和ExtensionAbility。
2.FA有主进程和渲染进程;而Stage有主进程,渲染进程和扩展进程。
3.FA模型通过config.json进行配置;而Stage通过app.json和module.json5进行配置。
文件上传
应用沙箱目录
沙箱是一种以安全为目的的隔离机制,避免数据收到恶意路径的穿越访问。在这种沙箱的保护下,应用可见的目录范围就是应用沙箱目录。
3个目录:
files:随应用的卸载而清理
cache:大小超过一定条件或者系统空间达到一定条件式,自动触发清理。
temp:当应用退出时就清理。
文件的常用操作:
import {fileIo as fs} from '@kit.CoreFileKit'
打开/创建文件:
const filePath: string = getContext(this).cacheDir + '/' + 'test.txt'
const file: fs.File | null = null
fs.open(filePath, fs.openMode.READ_WRITE | fs.openMode.CREATE).then((file: fs.File)=>{
console.log('文件创建成功!!!')
this.file = file
}) //在当前应用的缓存目录下打开test.txt文件,如果没有就创建此文件。
写入文件
fs.write(this.file?.fd, 'hello world').then((res)=>{console.log('文件写入成功!!!')})
删除文件
fs.unlink(this.file?.fd, (err: BusinessError)=>{
if(err){console.log('文件删除失败!!!')}
})
读取文件
//判断文件是否存在
const flag = fs.accessSync(this.filePath);
if(!flag){console.log('文件不存在')}
const readOption: ReadOptions = {offset: 0} //偏移值为0,使得文件写入是能立即读取
const stat = fs.StatSync(this.filePath)
const arrayBuffer = new ArrayBuffer(stat.size)
fs.read(this.file?.fd, arrayBuffer).then((readLen: number)=>{
const buf = buffer.from(arrayBuffer, 0, readLen)
console.log('文件读取成功!'+buf.toString())
})
上传文件(图片)
1.打开文件
const PhotoSelectOptions = new photoAccessHelper.PhotoSelectOptions();
PhotoSelectOptions.MIMEType = photoAccessHelper.PhotoViewMIMETypes.IMAGE_TYPE;
PhotoSelectOptions.maxSelectNumber = 5;
const photoPicker = new photoAccessHelper.PhotoViewPicker(); // 图库界面进行文件选择
photoPicker.select(PhotoSelectOptions).then((result: photoAccessHelper.PhotoSelectResult) => {
result.photoUris[0] // file://media/Photo/q/IMG_1732730211_000/1.jpg 得到文件路径
2.将文件拷贝至缓存目录
const context = getContext(this)
const fileType = 'jpg'
const fileName = Date.now() + '_' + (Math.floor(Math.random() * (99999 - 11111)) + 11111) + '.' + fileType
const copyFilePath = context.cacheDir + '/' + fileName
const file = fileIo.openSync(URI, fileIo.OpenMode.READ_ONLY)
fileIo.copyFileSync(file.fd, copyFilePath)
3.上传文件
import { BusinessError } from '@kit.BasicServicesKit';
let uploadTask: request.UploadTask;
let uploadConfig: request.UploadConfig = {
url: 'http://www.example.com', // 需要手动将url替换为真实服务器的HTTP协议地址
header: { 'Accept': '*/*' },
method: "POST",
files: [{ filename: "test", name: "test", uri: "internal://cache/test.jpg", type: "image/jpeg" }], // 建议type填写HTTP协议规范的MIME类型
data: [{ name: "name123", value: "123" }],
};
try {
request.uploadFile(getContext(), uploadConfig).then((data: request.UploadTask) => {
uploadTask = data;
}).catch((err: BusinessError) => {
console.error(`Failed to request the upload. Code: ${err.code}, message: ${err.message}`);
});
} catch (err) {
console.error(`Failed to request the upload. err: ${JSON.stringify(err)}`);
}
文件下载与压缩图片上传
文件下载只需要调用官方的request.download()方法即可,使用示例:
const cacheDir = getContext(this).cacheDir + '/'
request.downloadFile(getContext(), {url: 'http://tmp00002.zhaodashen.cn/hello.txt', filePath: cacheDir + 'download_hello.txt'}).then((data: request.DownloadTask)=>{
let downloadTask: request.DownloaTask = data
downloadTask.on('progress', (receivedSize: number, totalSize: number)=>{
console.log('下载中...'+receivedSize + '/' + totalSize)
})
downloadTask.on('complete', ()=>{console.log('下载完成!!!')})
})
图片压缩上传
在实际情况中,往往会遇到图片大小较大,并且服务器端对上传的文件大小有要求,此时就需要现将文件进行压缩,然后在上传。
整体思路:先通过photoAccessHelper.PhotoViewPicker的实例拉起图片选择窗口并选择文件。然后在应用的缓存目录新建一个文件(类型就为刚才选择的文件类型),并把刚才选择的文件复制到新建的文件里。然后把刚才赋值过来的文件进行压缩,压缩完成之后删除原来的文件,再新建一个文件(文件名不变),把刚才压缩的文件写到刚才的新建的文件里。此时已经可以上传文件了。为了优化用户体验,可以把上传的(图片)文件进行预览显示。
示例如下:
import { photoAccessHelper } from '@kit.MediaLibraryKit';
import { fileIo as fs} from '@kit.CoreFileKit';
import { BusinessError } from '@kit.BasicServicesKit';

//预览图
@state filepixel: pixelmap | null == null
//压缩图片的自定义方法

async compressImage(uri: string, quality: number) {
try {
// 创建ImageSource实例
const imageSource =image.createImageSource(uri)

  // 创建编码选项
  const options: image.PackingOption = {
    format: "image/jpeg", // 压缩格式
    quality: quality,    // 质量参数(0-100)
  };

  // 获取压缩后的图像
  const packer= image.createImagePacker();

  const packedImage = await packer.packToData(imageSource,options)

  // 返回压缩后的图像数据
  return packedImage
} catch (error) {
  console.error('压缩图片失败: ' + error);
  return null;
}

}

Button('选择文件并压缩').onClick(()=>{

const photoSelectOptions = new photoAccessHelper.PhotoSelectOptions();

photoSelectOptions.MIMEType = photoAccessHelper.PhotoViewMIMETypes.IMAGE_TYPE; // 过滤选择媒体文件类型为IMAGE。
photoSelectOptions.maxSelectNumber = 5; // 选择媒体文件的最大数目。

let uris: Array = [];
const photoViewPicker = new photoAccessHelper.PhotoViewPicker();
photoViewPicker.select(photoSelectOptions).then(async(photoSelectResult: photoAccessHelper.PhotoSelectResult) => {
uris = photoSelectResult.photoUris;
console.info('photoViewPicker.select to file succeed and uris are:' + uris);

//自定义文件信息

const cacheDir = getContext(this).cacheDir

const name = Date.now()

const type = uris[0].split('.').pop()

const filename = name + '.' + type

const filePath = cacheDir + '/' + filename

//打开刚才选择的图片文件

const file = fs.openSync(uris[0], fs.openMode.READ_ONLY)

//把图片文件复制到缓存目录

fs.copySync(file.id, filePath)

//对缓存目录下面的图片进行压缩
const compressfile = await compressIamge(filepath, 60)//返回一个arrayBuffer(字节数组)
//删除之前的缓存图片
fs.unlink(file.fd)
//重新建立刚才的文件
const file2 = fs.opensync(filepath, fs.openmode.read_write | fs.openMode.create)
//把压缩后的图片写进缓存目录
 fs.wirte(file2.fd, compressfile)
创建预览图
const imgresource = image.createimageresource(filepath)
this.filepixel = imgresource.createpixelmap()
}).catch((err: BusinessError) => {
console.error(Invoke photoViewPicker.select failed, code is ${err.code}, message is ${err.message});
})

})
image(this.filepixel).width('50%')
解压文件(zip)
1.定义解压文件和文件输出目录
let inFile =getContext(this).filesDir + '/' + 'download_hello4.zip';
let outFileDir = getContext(this).filesDir + '/';
2.通过zlib的decompressFile方法解压文件
let options: zlib.Options = {
level: zlib.CompressLevel.COMPRESS_LEVEL_DEFAULT_COMPRESSION
};
try {
zlib.decompressFile(inFile, outFileDir, options).then((data: void) => {
console.info('decompressFile success. data: ' + JSON.stringify(data));
}).catch((errData: BusinessError) => {
console.error(errData is errCode:${errData.code} message:${errData.message});
})
} catch (errData) {
let code = (errData as BusinessError).code;
let message = (errData as BusinessError).message;
console.error(errData is errCode:${code} message:${message});
}
元服务
鸿蒙里的元服务就类似于小程序一样,不需要下载,开发和普通的鸿蒙app一样。
服务卡片
服务卡片是一种界面展示形式,用于把应用的重要信息或操作前置到卡片上(比如显示购物车信息,车次信息等),已达到服务直达,减少层级服务的目的。卡片通常用于嵌入其它应用(当前只支持系统应该用,桌面),并支持拉起页面和发送消息等基础交互功能。
创建一个服务卡片:在需要创建卡片的模块右键选择创建wedget(dynamic wedget),选择hello world模板。
新建好一个wedget之后会生成三个文件,分别是对应的ets,EntryFormAbility.ts,form_cofig.js。其中ets用于布局,EntryFormAbility.ts里面是卡片的一些生命周期,form_config.js用于配置卡片,包括卡片的刷新时间,大小(几乘几)。
tip:配置卡片自动更新(config.js中设置)
"updateEnabled": true, 更新机制:true-scheduledUpdateTime false-updateDuration
"scheduledUpdateTime": "15:18", 切记设置,模拟器手机设置里面必须24小时制
"updateDuration": 0, 0就是指定时间,1指定时间半小时,2指定时间1小时
服务卡片的事件
postCardAction(this, {
action: 'router', //支持router(直接前台拉起一个页面并传递参数), call(后台拉起一个页面并传递参数), message(只发送消息和传递参数)三种模式
abilityName: "EntryAbility", //拉起的窗体,只有router和call才需要这个属性
params: {data: 'hello'} //传递的参数, 如果是call方式的话还需要传递一个method参数。
})
参数的接收(三种)
router方式:router方式在窗体创建的时候通过want.parameters来获取卡片传递的参数。示例如下:
const param: Record<string, Object> = want.parameters as Record<string, Object>
if(param){AppStorage.setOrCeate('data', param.data)}
call方式:call方式在传递参数需要多配置一个method参数,然后在窗体创建的时候通过this.callee.on方法来获取参数。示例如下:
postCardAction(this, {
action: 'call',
abilityName: 'EntryAbility',
params: {
method: 'fn',
data: "hello"
}
})
在窗体创建的生命周期函数里通过callee获取参数:
this.callee.on('fn', (data: rpc.MessageSequnece)=>{
//通过data.readString()来获取传递的参数的字符串
const param: Record<string, Object> = JSON.parse(data.readString()) as Record<string, Object>
if(param){AppStorage.setOrCreate('data', param.data)}
return new Demo()
})
//callee需要返回一个rpc的可序列化对象,还需要声明一个rpc可序列化对象
class Demo implements rpc.Parcelable{
marshalling(dataOut: rpc.MessageSequence): boolean{return true}
unmarshalling(dataIn: rpc.MessageSequence): boolean{return true}
}
//同时,还需要开启应用的后台保持启动权限
{
  "name": "ohos.permission.KEEP_BACKGROUND_RUNNING"
}
message方式
message方式是向服务卡片发送一条消息,并不会直接拉起app页面。在卡片的声明周期的onFormEvent获取发送给卡片的消息。
示例:
postCardAction(this, {
action: 'message',
params: {
data: 'hello'
}
})
在卡片的生命周期函数里:
onFormEvent(formId: string, message: string){
console.log(message) //打印的是整个params
//通过
formProvider.update(this, formBindData.createFormBindingData({str: 'success'}))
//此方式更新服务卡片的内容,此方法还可以在窗体内进行使用(窗体内向卡片发送数据进行更新就是通过该方法,但是需要现将formId存到AppStorage中,在窗体里通过formId向对应的卡片发送更新内容)
}
卡片的ets文件下,通过@LocalStorageProp('str') str: string = ''来获取卡片更新的内容。
卡片创建时自动将formId发送给页面
在卡片的onAddForm事件函数里添加如下代码
const formId = (want.parameters as Record)['ohos.extra.param.key.form_identity']
return formBindingData.createFormBindingData({formId})
//同时在卡片的ets文件下监听LocalStorageProp('formId')的变化
@LocalStorageProp('formId') @Watch('update') formId: string = ''
update(){ //formId更新时将formId通过后台发送形式发送给entry
postCardAction(this, {
action: 'call',
abilityName: 'EntryAbility',
params: {formId: this.formId}
})
}
entry通过callee.on方法接收传递过来的formId并存储到AppStorage中,共其它页面使用。
卡片加载图片
加载本地(项目里的)图片:和普通的ets文件通过Image标签加载本地图片一样的语法,示例如下:
Image($r('app.meida.app_icon'))
加载网络图片:需要现将网络图片下载到应用的临时目录下面,然后在进行加载,示例如下:
在卡片的声明周期函数里(onAddForm)通过网络请求的方式把网络图片下载到应用临时目录(这里以http请求为例)
const httpRequest = htpp.createHttp()
http.request('http://tmp00002.zhaodashen.cn/deskCartIcon.png', (err, data)=>{
if(!err && data.responseCode = http.ResponseCode.OK){
let tempDir = this.context.getApplicatonContext().tempDir
let fileName = 'file' + Date.now()
let tempFile = tempDir + '/' + fileName
let tempImg= fs.openSync(tempFile, fs.OpenMode.READ_WRITE | fs.OpenMode.CREATE)
fs.writeSync(tempImg.fd, data.result as ArrayBuffer)
let file: fs.File
let fileInfo: Record<string, string | number> = {}
try {
file = fs.openSync(tmpFile);
fileInfo[fileName] = file.fd;
} catch (e) {
hilog.error(0xFF00, ' qf ', openSync failed: ${JSON.stringify(e)});
}
    // 四、发送给服务卡片更新
    formProvider.updateForm(formId, formBindingData.createFormBindingData({
        data1:  res.list[0].goods_name,
      //   data2:  res.list[0].goods_img,
      data2: fileName,
      formImages: fileInfo // 切记必须写手册规定的
    })).then(() => {
      hilog.info(0xFF00, ' qf ', '%{public}s', 'FormAbility updateForm success.');
    })
}
})
//在卡片的ets文件下,通过localStorageProp获取传递的参数
@LocalStorageProp('data1') data1:string = '加载中..'
@LocalStorageProp('data2') data2:string = '加载中..'
Image('memory://' + this.data2).width('100%')
权限
1.权限级别:
normal:都可以使用(只要配置了就可以使用)
system_basic:配置了也还需要用户主动授权在可以使用
system_core:一般不具备这个权限。
2.授权方式:
系统授权(system_grant):应用安装后系统自动为其分配的权限;
用户授权(user_grant):该类型权限不仅需要在安装包中申请权限,还需要在应用动态运行的时候以弹窗的形式请求用户授权,在用户手动授权后,应用才能真正获取权限。
3.应用授权的步骤:
1.在配置文件中声明需要申请的权限(module.json5的requestPermissions)
2.检验当前是否授权(checkAccessToken)
3.动态向用户申请权限(requestPermissionsFromUser)
4.处理授权结果
权限申请工具封装:
import { abilityAccessCtrl, bundleManager, common, Permissions } from '@kit.AbilityKit';
import { BusinessError } from '@kit.BasicServicesKit';

class AccessControl {
  // 2 检查是否有权限
  async checkPermissionGrant(permission: Permissions): Promise<abilityAccessCtrl.GrantStatus> {
  let atManager: abilityAccessCtrl.AtManager = abilityAccessCtrl.createAtManager();
  let grantStatus: abilityAccessCtrl.GrantStatus = abilityAccessCtrl.GrantStatus.PERMISSION_DENIED;

  // 获取应用程序的accessTokenID
  let tokenId: number = 0;
  try {
    let bundleInfo: bundleManager.BundleInfo = await bundleManager.getBundleInfoForSelf(bundleManager.BundleFlag.GET_BUNDLE_INFO_WITH_APPLICATION);
    let appInfo: bundleManager.ApplicationInfo = bundleInfo.appInfo;
    tokenId = appInfo.accessTokenId;
  } catch (error) {
    const err: BusinessError = error as BusinessError;
    console.error(`Failed to get bundle info for self. Code is ${err.code}, message is ${err.message}`);
  }

  // 校验应用是否被授予权限
  try {
    grantStatus = await atManager.checkAccessToken(tokenId, permission);
  } catch (error) {
    const err: BusinessError = error as BusinessError;
    console.error(`Failed to check access token. Code is ${err.code}, message is ${err.message}`);
  }

  return grantStatus;
}

  async checkPermissions(permission: Permissions): Promise<boolean> {
    // const grantStatus: boolean = await checkPermissionGrant('ohos.permission.LOCATION') === abilityAccessCtrl.GrantStatus.PERMISSION_GRANTED;// 获取精确定位权限状态
    const grantStatus: boolean = await this.checkPermissionGrant(permission) === abilityAccessCtrl.GrantStatus.PERMISSION_GRANTED;// 获取精确定位权限状态
    // return grantStatus

    if (!grantStatus) {
      // 3 动态获取权限
      // const state2 = await this.reqPermissionsFromUser(['ohos.permission.MICROPHONE'], getContext(this) as common.UIAbilityContext);
      const state = await this.reqPermissionsFromUser([permission], getContext(this) as common.UIAbilityContext);
      // console.log('3 动态获取权限 ', state)
      if (!state) return false
    }

    return true
  }


  // 3 动态向用户申请权限
  async reqPermissionsFromUser(permissions: Array<Permissions>, context: common.UIAbilityContext): Promise<boolean> {
    let atManager: abilityAccessCtrl.AtManager = abilityAccessCtrl.createAtManager();
    // requestPermissionsFromUser会判断权限的授权状态来决定是否唤起弹窗
    return atManager.requestPermissionsFromUser(context, permissions).then(async (data) => {
      let grantStatus: Array<number> = data.authResults;
      let length: number = grantStatus.length;
      for (let i = 0; i < length; i++) {
        if (grantStatus[i] === 0) {
          // 用户授权,可以继续访问目标操作
          return true
        } else {
          // 用户拒绝授权,提示用户必须授权才能访问当前页面的功能,并引导用户到系统设置中打开相应的权限
          // return false;  切记一定是false看用户选择的
          return await this.onSetting(permissions, context);
        }
      }
      return false
      // 授权成功
    }).catch((err: BusinessError) => {
      console.error(`Failed to request permissions from user. Code is ${err.code}, message is ${err.message}`);
      return false
    })
  }


  // 4 向用户申请二次授权
  onSetting(permissions: Array<Permissions>, context: common.UIAbilityContext):Promise<boolean> {
    let atManager: abilityAccessCtrl.AtManager = abilityAccessCtrl.createAtManager();
    // let context: Context = getContext(this) as common.UIAbilityContext;
    // atManager.requestPermissionOnSetting(context, ['ohos.permission.APPROXIMATELY_LOCATION']).then((data: Array<abilityAccessCtrl.GrantStatus>) => {
    return atManager.requestPermissionOnSetting(context, permissions).then((data: Array<abilityAccessCtrl.GrantStatus>) => {
      console.info('data:' + JSON.stringify(data));
      return data[0] === abilityAccessCtrl.GrantStatus.PERMISSION_GRANTED
    }).catch((err: BusinessError) => {
      console.error('data:' + JSON.stringify(err));
      return false
    });
  }

  // ....
}
export default new AccessControl()
首先权限申请:
1.在配置文件中声明权限并写明申请原因
// 通讯录(权限组-读写)
{
"name": "ohos.permission.READ_CONTACTS",
"reason": '$string:permission_reason_contact',
"usedScene": {}
},
2.自动签名
配置好声明权限,直接模拟器运行会报错,因为这些权限需要签名(目的就是告诉开发者这些权限不是说直接就可以用,上架的时候需要审批通过才可以用)
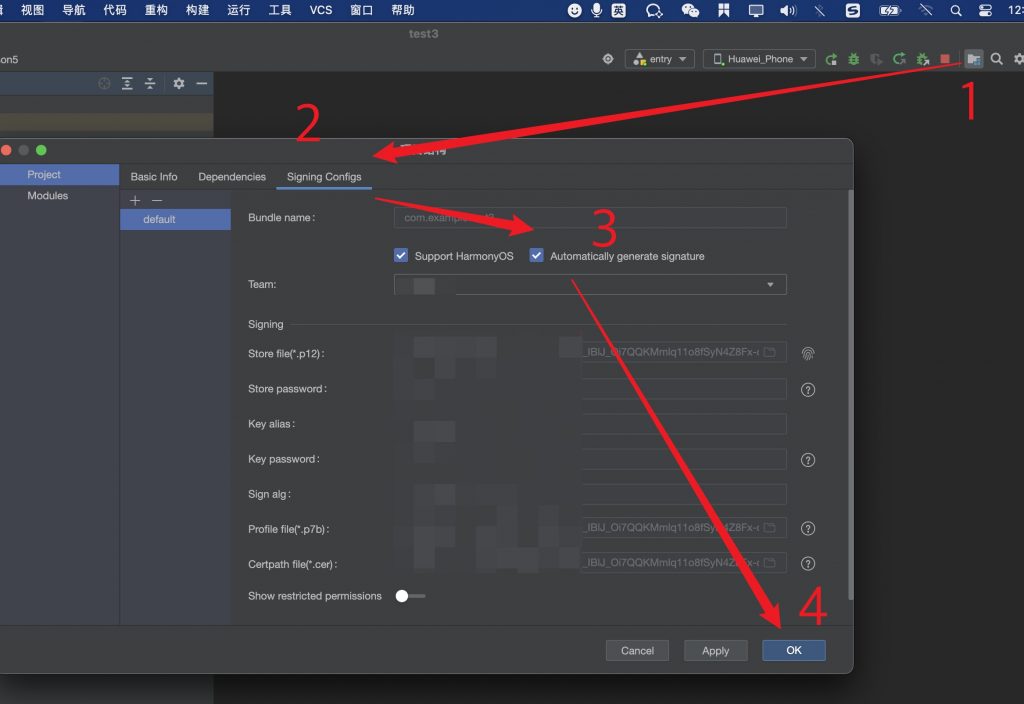
配置完在运行就没事了,
然后就可以使用测试调用AccessControl.ets里面的方法
术语:
APL(Ability Privilege Level)应用的权限申请优先级的定义,不同等级的应用能够申请的权限等级不同。
ACL(Access Control List)访问控制列表 (也就是受限开放权限里面的权限,老手册会有标记现在新的手册没有了)
AGC(AppGallery Connect) 应用市场
权限级别:normal-都可以用、system_basic-需要签名、system_core-三方无权 (APL表达的思想)
授权方式:
- system_grant系统授权-用户安装应用时自动授权后续无感:internet网络/蓝牙配置/应用基本信息/…/身份认证/Wi-Fi信息/陀螺仪传感器信息等等
- user_grant用户授权-弹框:相机/位置信息/媒体文件/麦克风/日历/用户运动状态/设备数据交换/用户健康等等
应用进程线程
进程
同一个应用(同一个Bundle名称)中,所有的UIAbility,ServiceExtendAbilty,DataShareAbility均是运行在同一个进程中(主进程:Main Process)的;(主进程)
同一个应用中,所有的ExtensionAbility均是运行在一个独立的进程中(扩展进程)
WebView拥有独立的渲染进程(render process)
线程
Stage模型下的线程可以分为三类
主线程:
1.执行UI绘制
2.管理ArkTS的引擎实例,十多个UIAbility能运行在其之上。
3.管理其它线程的ArkTS引擎实例,例如使用TaskPool(任务池)创建或者取消任务,启动和终止线程。
4.分发交互事件
5.处理应用代码的回调,包括事件处理和生命周期管理
6.接收taskpool和worker线程发送的消息
TaskPool(任务池):用于执行耗时操作,支持设计调度优先级,可以负载均衡,推荐使用
worker:用于执行耗时操作,可以用线程之间的通信
线程通讯
场景 能力支持
同Ability通信:emitter,eventHub,commonEvent
跨Ability通信:emitter, eventHub, commonEvent
跨线程通信:   emitter, commonEvent, worker, taskpool
跨进程通信:   commonEvent, IPC&RPC
案例:
//TaskPool

@Concurrent

function sum(){

let sum = 0;

for(lei i = 0; i <= 10000000; i++){sum+=i}

return sum

}

@Entry

@Component

struct Index{

async aboutToAppear(){

const res = await taskpool.excute('sum')

console.log(res.toString())

}

}

//主线程与TaskPOOL线程进行通信
//将sum函数中的return改为taskpool.task.sendData(sum)
async aboutToAppear(){
const task = new taskpool.task('sum')
task.onReceiveData((data: number)=>{console.log(data.tostring())})
taskpool.excute(task)
}
//worker
//在想要创建worker的模块上右键新建一个worker(选择hello即可)
const workerState: worker.thread = new worker.thread('entry/ets/workers/test.ets')通过this.workerState.onmessage = (evet: MessageEvents)=>{console.log(JSON.stringify(event))}获取收到的消息
通过this.workerState.postMessage(data)发送消息
在test.ets中通过workerPort.onMessage = (data: MessageEvents)=>{}来获取接收到的消息
通过workerPort.postMessage(data) 来发送消息
EventHub
通过上下文的eventHub来发送和接收消息
getContext(this).eventHub.emit('msg', data)
通过getContext(this).eventHub.on('msg', (data: string)=>{console.log(data)})//来获取收到的消息
emitter
通过emitter.emit({eventId: 1}, {data: 100}) //来发送消息
通过emitter.on({eventId: 1}, (param: emitter.EventData)=>{console.log(JSON.stringify(param.data))})//来获取收到的消息
commonEvent(订阅事件)
详情看官网:
叨叨几句... NOTHING